
| 일 | 월 | 화 | 수 | 목 | 금 | 토 |
|---|---|---|---|---|---|---|
| 1 | ||||||
| 2 | 3 | 4 | 5 | 6 | 7 | 8 |
| 9 | 10 | 11 | 12 | 13 | 14 | 15 |
| 16 | 17 | 18 | 19 | 20 | 21 | 22 |
| 23 | 24 | 25 | 26 | 27 | 28 | 29 |
| 30 |
- 이클립스
- 자바 #java #이클립스 #eclipse #switch #switch문 #사칙연산 #계산기 #calculator #간단한계산기
- 어노테이션
- MVC
- 알고리즘
- 내림차순정렬
- 이클립스 #이클립스단축키 #자바 #자바단축키
- annotation
- 스프링
- Spring
- Swing
- GUI
- 계산기
- 버블소트
- 자바
- 버블정렬
- 계산기GUI
- 오름차순정렬
- 자바알고리즘
- 배열정렬
- Java
- 자바GUI
- 자바 계산기
- Eclipse
- 숫자정렬
- Today
- Total
온 코딩
[Spring boot](Spring starter JPA) Thymeleaf 시작 th: 태그모음 본문
[Spring boot](Spring starter JPA) Thymeleaf 시작 th: 태그모음
SummerON 2021. 7. 8. 18:141. 프로젝트 준비
sts에는 스프링부트 2.3~으로 설정
build.gradle 수정
testImplementation('org.springframework.boot:spring-boot-starter-test')
이 부분을
testImplementation('org.springframework.boot:spring-boot-starter-test') {
exclude group: 'org.junit.vintage', module: 'junit-vintage-engine'
}
compile group: 'org.thymeleaf.extras', name: 'thymeleaf-extras-java8time'
이렇게!
thymeleaf의 숫자, 날짜 관련 포맷
설정
스프링MVC와 thymeleaf
스프링부트에서는 별도의 설정을 통해 JSP등을 사용할 수 있지만, 스프링 부트의 원래 목적이 보다 빠르고 편리하게 개발하는 것을 지향하기 때문에 JSP보다는 쉽고 간결하게 UI를 해결할 수 있는 Template 플러스인을 사용하여 개발
기본적으로 FreeMarker, Mustache 등을 이용하여 개발
thymelear를 사용하는 이유
1. JSP와 유사하게 ${ }을 별도 설정 없이 바로 사용가능
2. Model에 담긴 객체를 JavaScript에서도 쉽게 처리 가능
3. 연산, 포맷과 관련된 기능에 대한 추가 개발 없이 사용 할 수 있도록 지원
4. 개발도구 (즉, ~~~.html)파일로 생성하는데 문제가 없고 해당 파일호출가능
기존 JSP와 같이 내부에서 전달 된 객체를 사용하기 위해 여러가지 설정을 주어야하지만,
thymeleaf은 <html lang="en" xmlns:th="http://www.thymeleaf.org">이 부분만 미리 설정
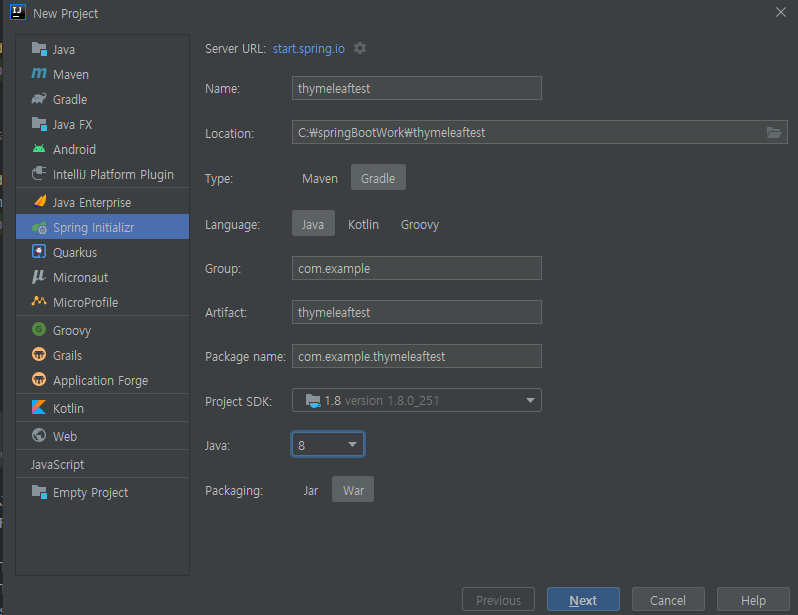
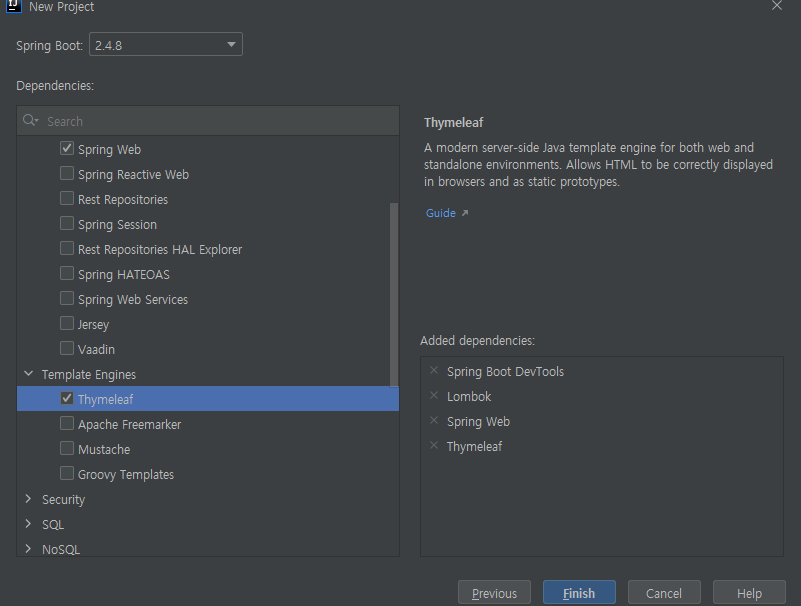
thymeleaf 프로젝트 생성 시 주의사항
IntelliJ는 Spring Boot버전이 기본값으로 최신버전이 설정되어 있기 때문에 thymeleaf를 완벽하게 지원할 수 있는 버전으로 변경하여 생성
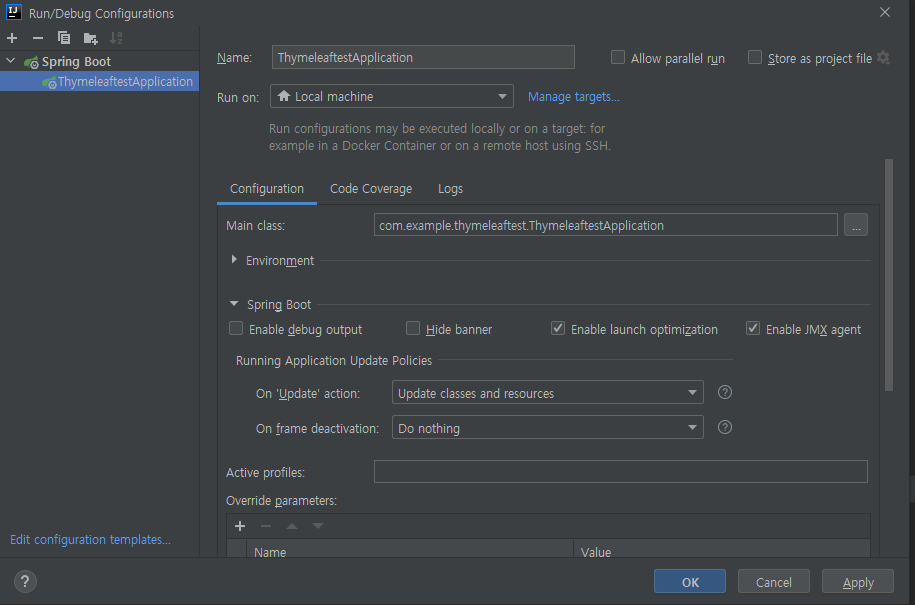
thymeleaf를 이용하는 프로젝트는 내부코드변경후에 만들어진 결과를 서버 내에 보관하는 것이 기본값으로 설정되어있다. 보관하지 않도록 설정하려면 application.properties 파일 내에 spring.thymeleaf.cache=false 추가
Spring Boot - UI
1. Controller -> DTO -> thymeleaf~~~.html
만드는 순서 : DTO -> Controller -> html
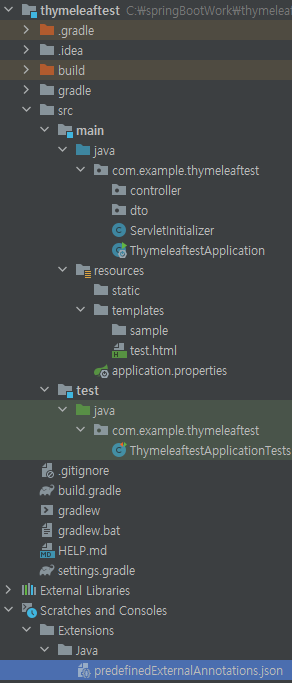
Controller : src/main/java => 기본패키지 => 패키지 추가 (controller)
DTO : src/main/java => 기본패키지 => 패키지 추가 (dto)
thyleaf~~~.html :
*thymeleaf를 프로젝트 생성 시, templates 폴더를 기본으로 사용
thymeleaf~~.html을 사용하는 하위폴더 사용할 것임
프로젝트 기본구조
1. DTO
Lombok
@Data : getter/setter, toString(), equals(), hashCode() 를 자동 생성
@Builder(toBuilder=true) 클래스.builder().멤버변수().멤버변수().build();
package com.example.thymeleaftest.dto;

import lombok.Builder;
import lombok.Data;

import java.time.LocalDateTime;

@Data
@Builder(toBuilder = true)
public class sampleDTO {
    private Long sno;
    private String first;
    private String last;
    private LocalDateTime regTime;
}
2.Controller
package com.example.thymeleaftest.controller;

import com.example.thymeleaftest.dto.SampleDTO;
import lombok.extern.log4j.Log4j2;
import org.springframework.stereotype.Controller;
import org.springframework.ui.Model;
import org.springframework.web.bind.annotation.GetMapping;
import org.springframework.web.bind.annotation.RequestMapping;

import java.time.LocalDateTime;
import java.util.List;
import java.util.stream.Collectors;
import java.util.stream.IntStream;

@Controller
@RequestMapping("/sample")
@Log4j2
public class SampleController {

    @GetMapping("/ex1")
    public void ex1(){
        log.info("되냐 안되냐 졸지 말고 수업들어!~!!!!");
    }

    //외부로부터 Model 객체를 전달받아 Model 객체에 20개의 DTO객체를 담아 ex2.html로 전달
    //Model 객체는 Spring Boot가 자동으로 생성하여 전달하기 때문에 개발자는 별도 작업이 필요없다
    @GetMapping({"/ex2", "/exLink"}) //다중 url 설정이 가능
    public void exModel(Model model){
        List<SampleDTO> list = IntStream.rangeClosed(1,20).asLongStream().mapToObj(i ->{
            SampleDTO dto = SampleDTO.builder().sno(i).first("first  "+i).last("/last  "+i).regTime(LocalDateTime.now()).build();
            return dto;

        }).collect(Collectors.toList());
        model.addAttribute("list",list);
    }


}
3. Thymeleaf~~~.html
파일명은 세부요청 URL과 동일하게 만들어야 함
=> 컨트롤러의 해당 메서드가 일을 처리한 후, 요청 URL에 해당하는 ~~~.html 파일을 호출 / 전달되는 값이 잇을 경우 자동으로 대상 파일에게 전달 됨
html 태그 내에서 th: 를 붙여주고 Thymeleaf이 제공하는 각종 속성을 이용하여 값을 설정
JSP 와 달리 별도의 태그를 사요하지 않고 HTML 을 유지한 상태에서 개발 가능
구동 시 : application 실행 시켜놓고 주소줄에 직접 주소 입력!
http://localhost:8080/sample/ex2 <- 주소줄 입력
<!DOCTYPE html>
<html lang="en" xmlns:th="http://www.thymeleaf.org">
<head>
    <meta charset="UTF-8">
    <title>Title</title>
</head>
<body>
<!--<ul>
    <li th:each="dto : ${list }">
        [[${dto}]]
    </li>
</ul>-->
<ul>
    <li th:each="dto, state : ${list }">
       [[${state.index}]] ---- [[${dto}]]
    </li>
</ul>
</body>
</html>
<li th:each="dto : ${list }">
[[${dto}]]
</li>
타임리프의 반복문 처리 th:each 속성을 이용
결과값

state는 내부에 index와 count를 가지고 있는데,
index는 추출되는 객체의 위치 즉, List 내의 index 번호를 저장받고, count는 추출되는 객체의 순서 즉, 첫번째인지 두번?째인지를 저장받기 때문에
state.index -> 0~~~
state.count -> 1~~~
이렇게 출력 됨
th:if
th:unless
<!DOCTYPE html>
<html lang="en" xmlns:th="http://www.thymeleaf.org">
<head>
    <meta charset="UTF-8">
    <title>Title</title>
</head>
<body>


<ul>
    <li th:each="dto, state : ${list }" th:if="${dto.sno % 5 == 0}">
         [[${dto}]]
    </li>
</ul>
<ul>
    <li th:each="dto, state : ${list }" >
        <span th:if ="${dto.sno % 5 == 0}" th:text="${'what am I doing? '+dto.sno}"></span>
        <span th:unless="${dto.sno % 5 == 0}" th:text="${dto.sno}"></span>
    </li>
</ul>

</body>
</html>
th:text = "${조건} ? true : false"
스타일 적용 th:class 이용
<!DOCTYPE html>
<html lang="en" xmlns:th="http://www.thymeleaf.org">
<head>
    <meta charset="UTF-8">
    <title>Title</title>
</head>
<body>


<ul>
    <li th:each="dto, state : ${list }" th:class="${dto.sno % 5 == 0 } ?'target'" th:text="${dto.sno}">
    </li>
</ul>
<ul>
    <li th:each="dto, state : ${list }" th:text="${dto.sno % 5 == 0 } ? ${dto.sno}: ${dto.first}" >
    </li>
</ul>

<style>
    .target{
        background-color:pink;
    }

</style>

</body>
</html>
링크 적용
th:href를 이용
1. 단순하게 링크만 사용할 경우
<a th:href="@{주소}">출력내용</a>
2. 파라미터 추가
<a th:href="@{주소(파라미터명=값)}">출력내용</a>
<!DOCTYPE html>
<html lang="en" xmlns:th="http://www.thymeleaf.org">
<head>
    <meta charset="UTF-8">
    <title>Title</title>
</head>
<body>
단순링크
<ul>
    <li th:each="dto : ${list}">
        <a th:href="@{/sample/exView}">
            [[${dto}]]
        </a>
    </li>
</ul>
<hr/>

파라미터 추가
<ul>
    <li th:each="dto : ${list}">
        <a th:href="@{/sample/exView(sno=${dto.sno})}">
            [[${dto}]]
        </a>
    </li>
</ul>

sno를 모두 5자리 형식으로
<ul>
    <li th:each="dto : ${list}">
      [[${#numbers.formatInteger(dto.sno, 5)}]]
    </li>
</ul>

날짜 출력 형식을 시간을 제외하고 날짜만
<ul>
    <li th:each="dto : ${list}">
        [[${dto.sno}]] -- [[${#temporals.format(dto.regTime, 'yyyy/MM/dd')}]]
    </li>
</ul>

</body>
</html>'복습 ARCHIVE > 모델별 프로젝트' 카테고리의 다른 글
| [Spring Boot] JPQL과 SQL / Query Annotation / Querydsl (0) | 2021.07.16 |
|---|---|
| [Spring Boot- Thymeleaf] 레이아웃 짜는 법 - Bootstrap (0) | 2021.07.09 |
| [Spring Boot](Spring Data JPA) memoTest - IntelliJ2 (0) | 2021.07.08 |
| [Spring Data JPA] memoTest - IntelliJ (0) | 2021.07.07 |
| [이론] ORM,JPA, Hibernate, Spring Data JPA (0) | 2021.07.07 |

